In late 2011 I bought a stock Ibanez S420 guitar, which I’ve used for most of my musical projects since then. While I like the guitar I’ve always felt that I wasn’t happy with the stock pickups, the Ibanez INF1 and INF2. I can’t even articulate what it was I didn’t like about them. Maybe they were too boomy? Maybe they lacked definition? I don’t know, but I’d managed to convince myself I didn’t like them.
Fast forward to 2014, in order to deflect my increasing frustration with music I decided I would actually change the stock pickups out for something new. This led to the first problem: what to exchange them with?
There are, I believe, a hundred million companies that make guitar pickups. Most of the pickups are marketed based on what I’d consider nebulous terms. “Vintage output”, “sterile edginess”, “smooth mids”, “Useless numeric value of parameter.” I don’t want to read about how pickups sound, I want to hear how pickups sound. Guitar manufacturers sell guitars on their websites pretty much through images alone, like that means anything to a buyer. At least some pickup manufacturers have little videos or samples, but not much in the way of comparisons. You can listen to a video of some well-known guitarist playing pickups on their custom guitar, but no comparison with other pickups in that same guitar, or even details about what huge rack of effects and settings they’re using with those pickups. I also don’t live in an area that features a “hear what stuff sounds like” store, so I can’t just go try pickups out.
I eventually settled on what I figured was a safe bet: a Dimarzio Liquifire and Crunch Lab set, which are marketed as a set from Dimarzio based around John Petrucci from Dream Theater. I like John Petrucci’s work, even though I don’t sound like him, and can’t play like him. I didn’t have any misguided belief that new pickups would make me able to play better – they won’t.
I also watched a few shitty youtube videos of people who changed their pickups to the Liquifire/Crunch Lab set but didn’t provide comparisons.
I bought the “F” spacing pickups, which are slightly wider spacing on the pole pieces. I don’t know if it actually would have made the difference. Here’s what Dimarzio has to say about F-Spacing:
“For proper string alignment and balanced output, F-spaced humbuckers should be used in the bridge position on all guitars with string spacing at the bridge of 2.1″ (53 mm) or greater. On these guitars, if the nut width is 1-11/16” (43 mm) or greater, F-spaced pickups can be used in the neck position as well.”
On my S420 I measured the string width at the nut to be 36 mm. The width at the bridge was be 53 mm. The width at the neck pickup was 49 mm, and the spacing of the poles on the INF1 neck pickup was 51 mm. That’s right on the limit so probably either would have worked. I got F-spacing pickups for both the Liquifire and the Crunch Lab.

I’m not scared of soldering and electronics work, and I’m cheap, so I did the work myself. What annoyed me about the process is actually how little information exists on how the guitar is wired. The Dimarzio information included with the pickups is fine, but they didn’t have a specific wiring setup for my S420. So I’m left to scour the bowels of the internet with google for strange forum posts from years ago where people have mysterious diagrams and hearsay about how the guitar is wired up.
Therein lies the whole reason I’m writing this post. I rewired the S420 for new Dimarzio pickups and everything actually worked, so I’ll try to document everything involved.
Although I specifically replaced my pickups with the Liquifire and Crunch Lab, all the Dimarzio pickups are wired the same way. Hopefully other pickup manufacturers document their wiring sufficiently to adapt the steps.
I can’t vouch for it other than the Dimarzio and Ibanez wiring, but this appears to show a whole lot of manufacturers and their pickup wiring. There’s a caveat I’ve annotated the picture with about the Ibanez pickups that I’ll get to later in this article.

(If you make a nice and useful chart, give yourself some credit on it, so I can give you credit. Alternately, don’t cut people’s credits out of their charts ya bastards)
The S420 is pretty simple: two humbucking pickups, five-way selector switch. The stock switch positions give:
- Neck pickup normal configuration
- Neck pickup parallel coil configuration
- Neck and Bridge pickup together (this is important later)
- One coil of the neck and one coil of the bridge pickup
- Bridge pickup normal configuration
I didn’t attempt to modify any of this, as overall I’m happy with the options. If you want to add more push-pull knobs for coil taps or change what the selector does, you go right ahead, but I didn’t do that.
Let’s start off with how the S420 wiring cavity cutout in the back of the guitar looks in the default configuration. Yes, this looks like a mess, and this is how it comes from the factory. Don’t let that worry you.

Here’s that same picture, annotated a little bit to show what we’re looking at.
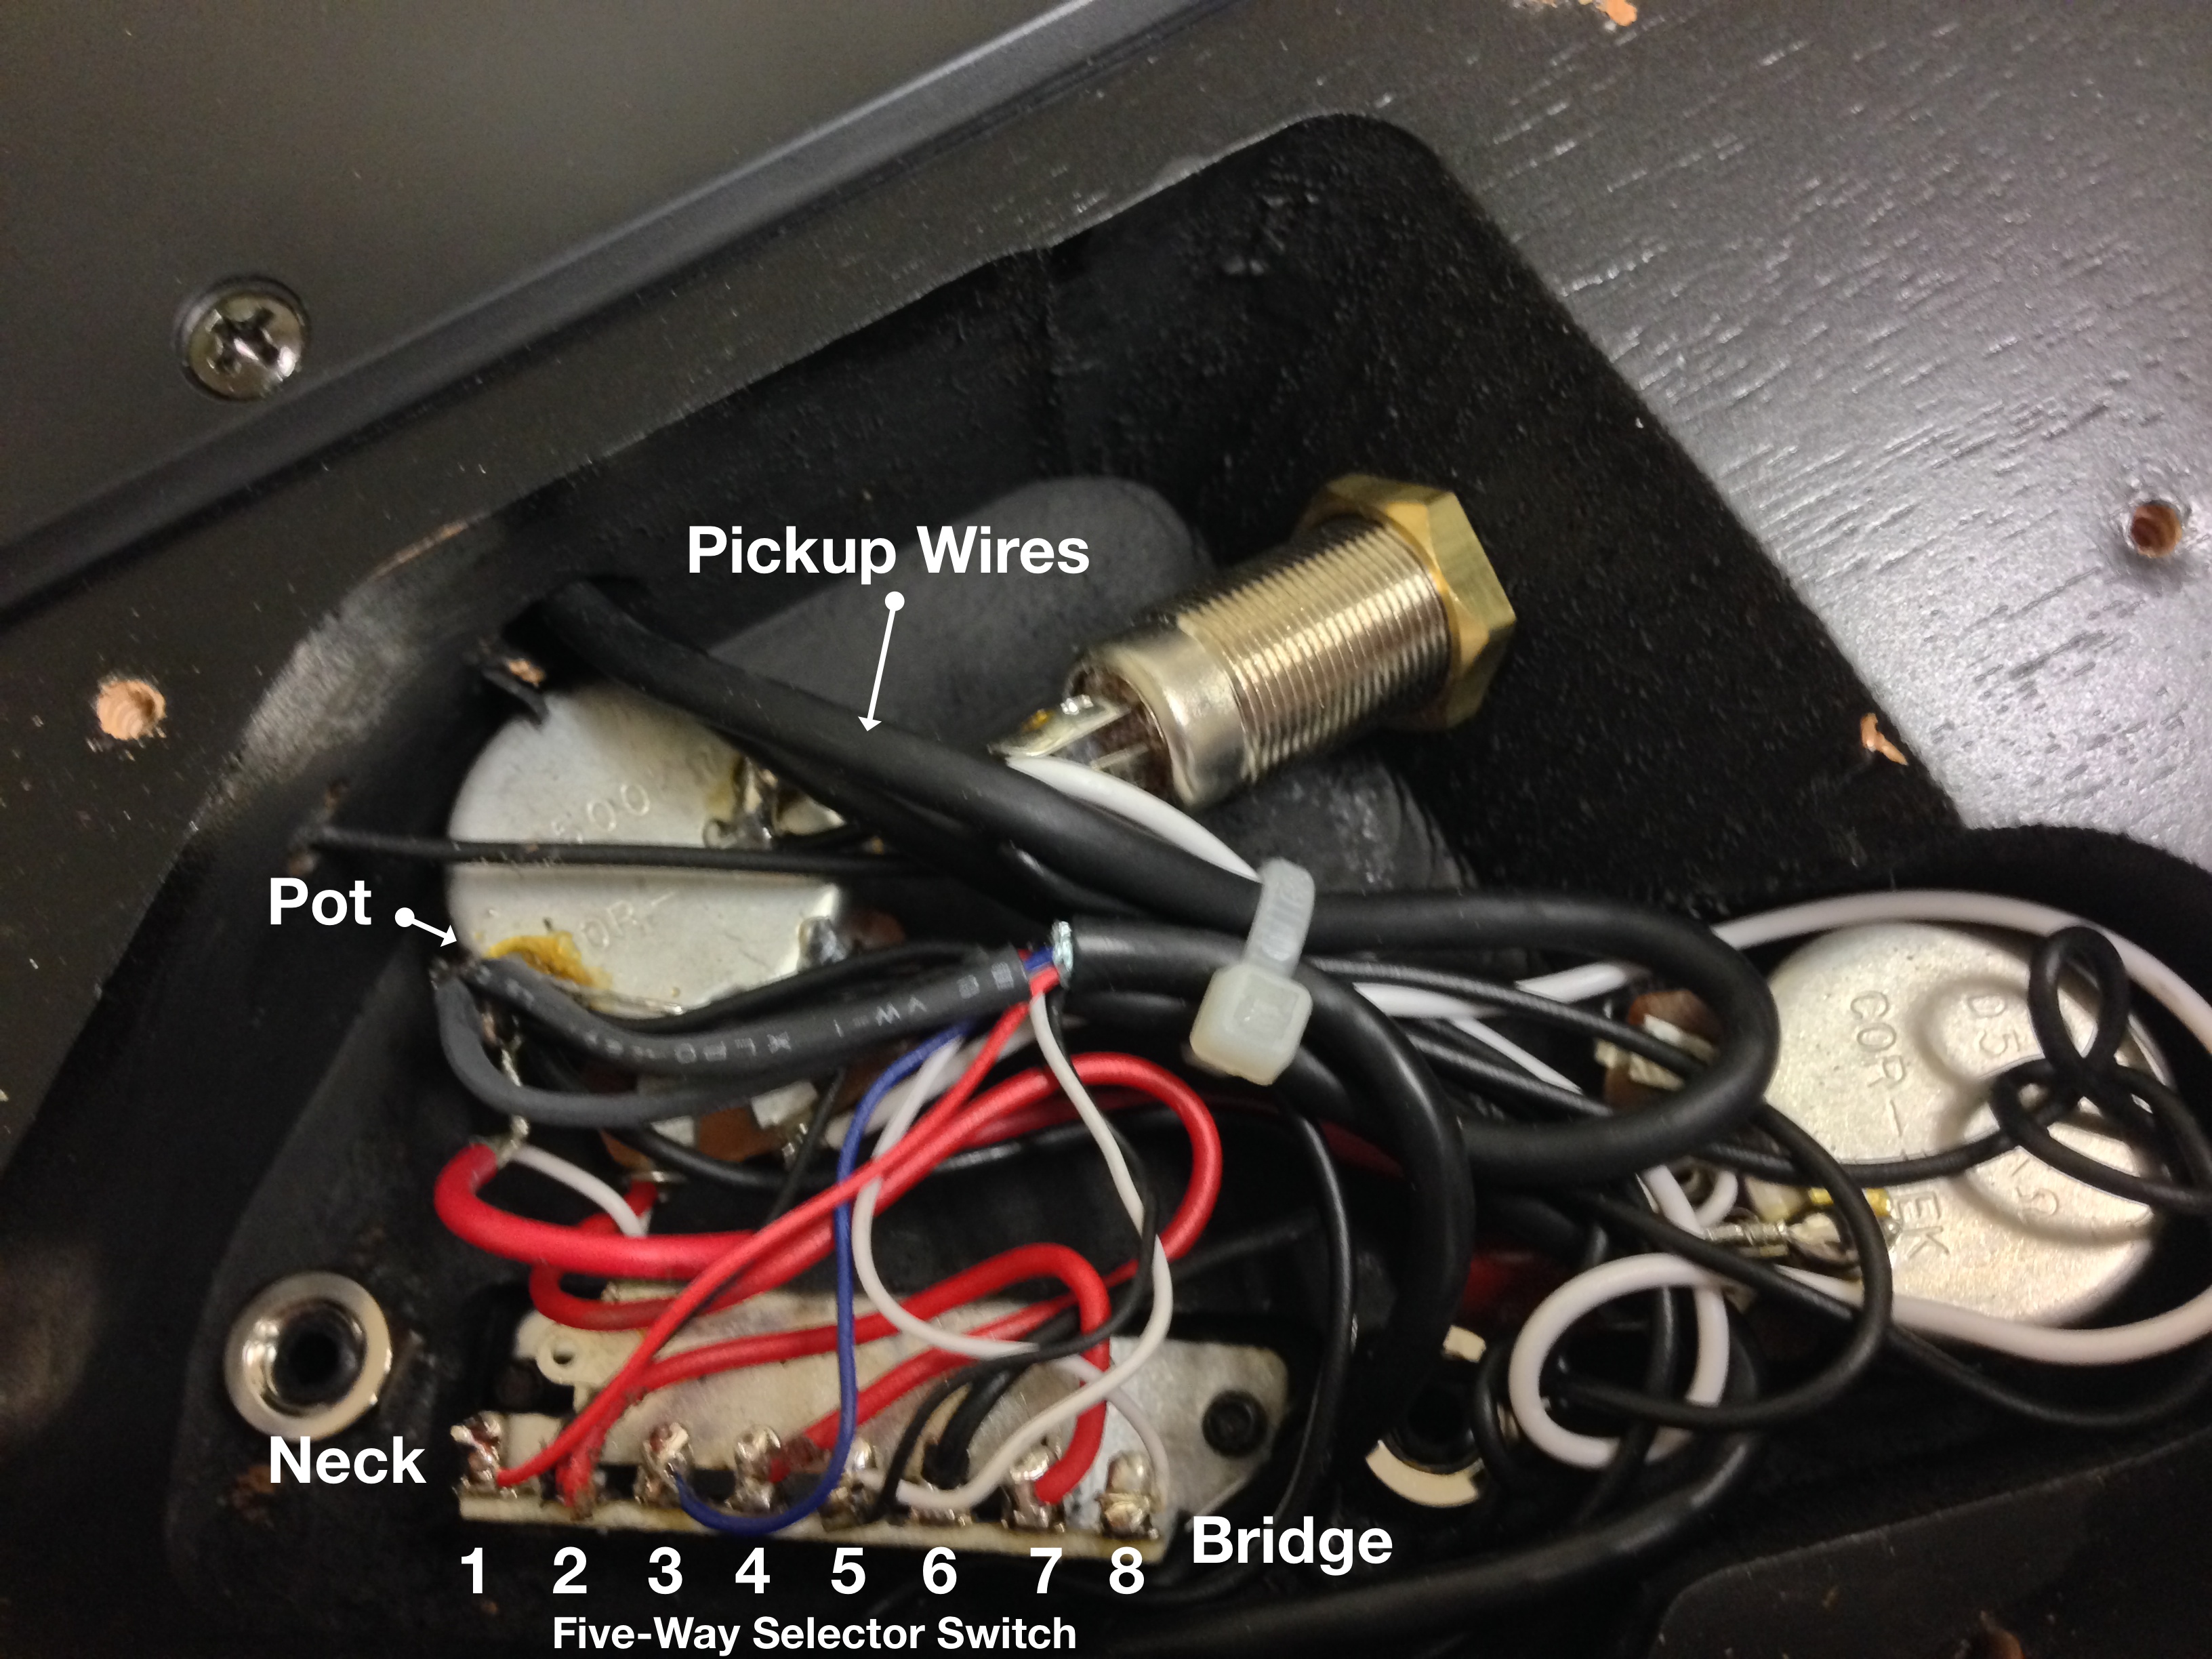
You can see the wires with the white cable tie around them are from the pickups, and the row of contacts that are the bottom is the five-way selector switch. I didn’t change any of the potentiometers (“pots”) or the output jack so that wiring will all stay the same.
The pickups themselves are mounted in the pickup cavities routed out of the top of the guitar, and the wires snaked down through holes drilled into this wiring cavity. In order to take the pickups out you have to un-solder the wires here first. So don’t unscrew the pickups and start hauling on the wires before disconnecting them.
Here’s a wiring diagram I found somewhere on one of those deep dark forum posts and not on Ibanez’s own website (Ibanez: do better). I don’t even know if this is actually for the S420, as it doesn’t say “S420” anywhere on it.

After I sat and traced wiring myself I confirmed that, at least for the pickups, this diagram is correct for my S420. Here’s a diagram showing the relationship between the wiring diagram and that physical picture of the guitar cavity:
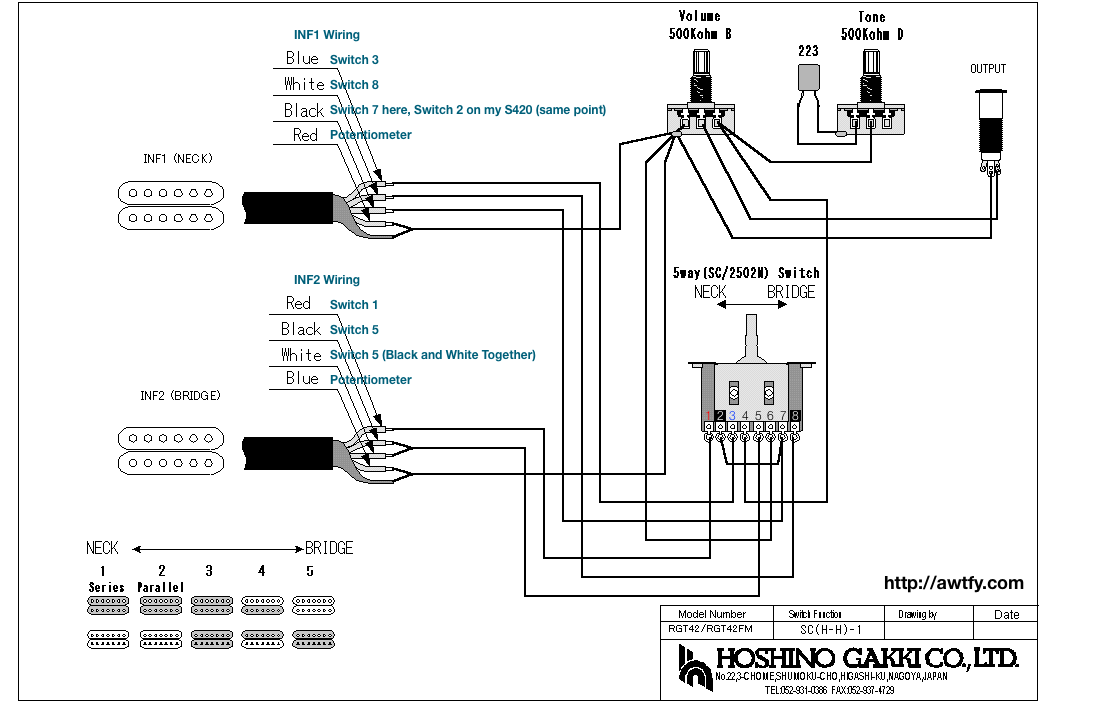
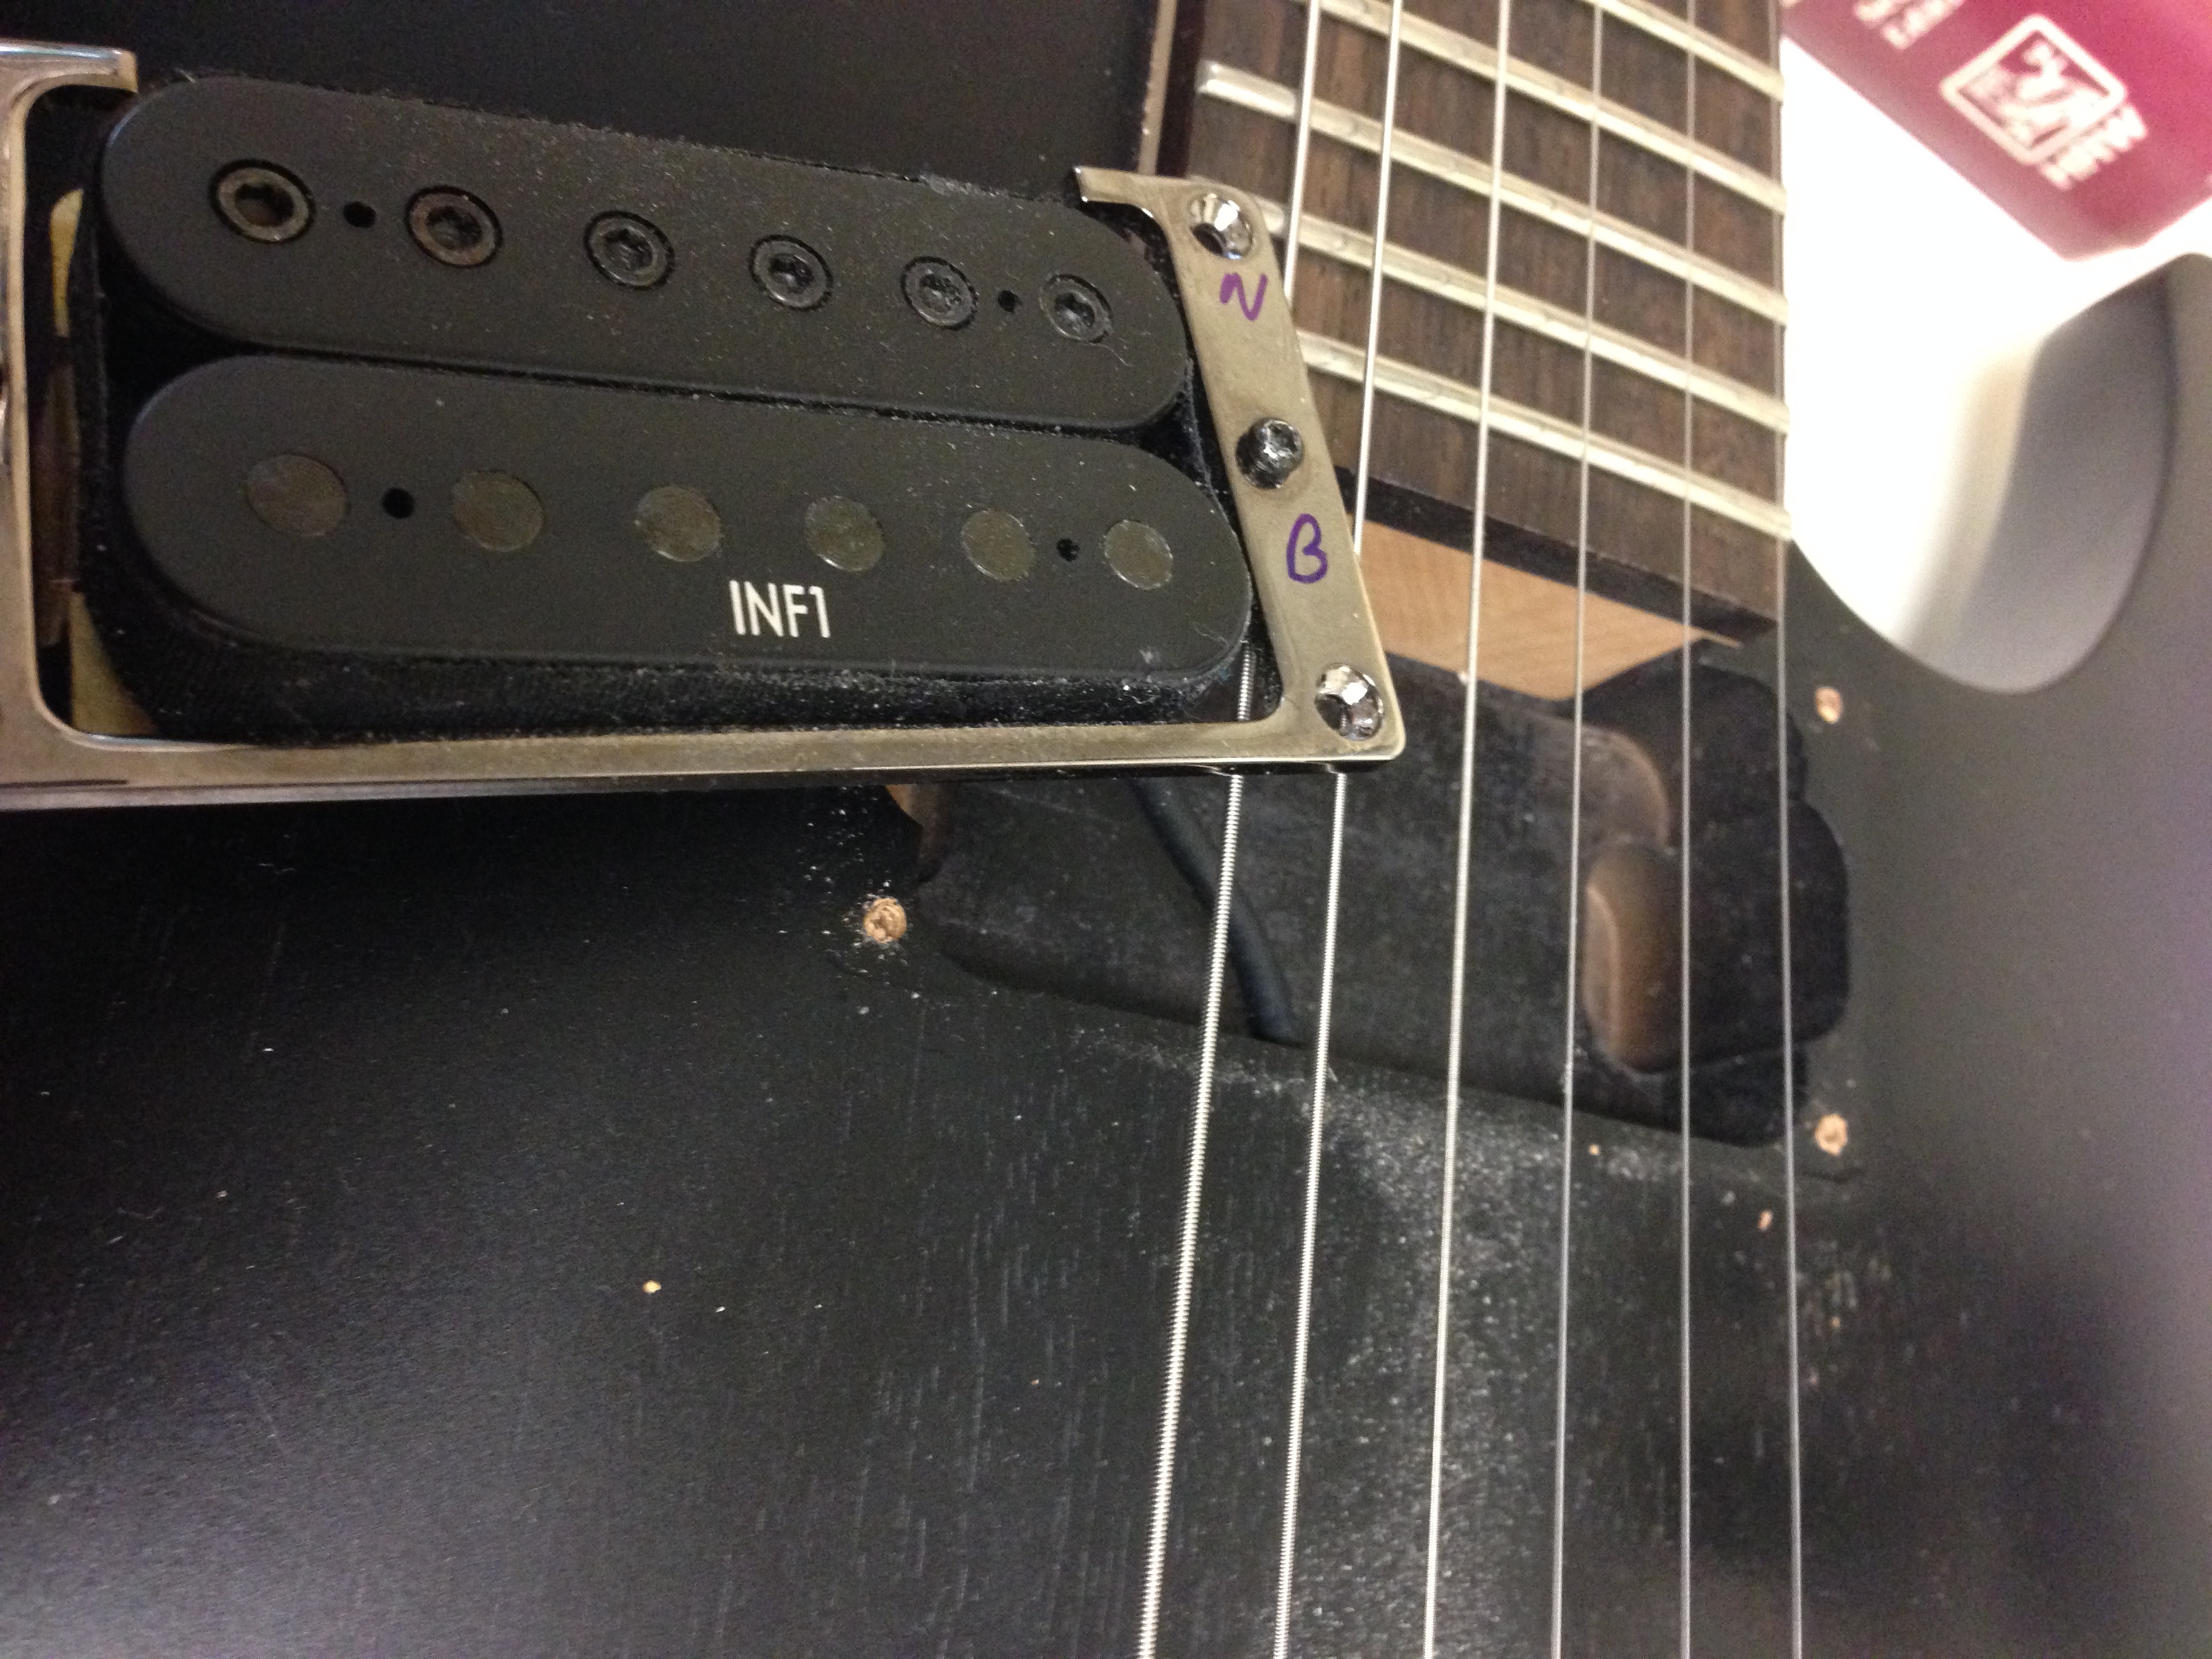
Note that it shows the INF1 and INF2 pickups, which I replaced with the Liquifire (neck position, where the INF1 was) and the Crunch Lab (Bridge Position, where the INF2 was). See how the INF1 and INF2 are shown with the same red/black/white/blue wire scheme for the pickups? Humbucking pickups are two sets of coils, which you can wire in series (normal configuration), or do other tricks like coil-tapping (using only one set), or wiring them in parallel (which the S420 does in switch position 2). For the INF1 and INF2 one set of coils goes to the Red/Black pair, and one set goes to the White/Blue pair.
Here’s a spoiler that will save you some grief later. The INF1 and INF2 pickups are purposely wired with opposite polarity, probably to make the assembly and wire charts easier. This is documented nowhere, other than I found it out myself.
The Dimarzio pickups are all wired “the same way” with respect to polarity. The pairs are Red/Black and White/Green (not blue, don’t worry about that). The polarity on the Liquifire and Crunch Lab (and I assume all Dimarzio pickups) are the same.
This means that when you replace the INF2 (bridge) pickup with a Dimarzio, you have to reverse a set of the coils, or else the pickup will be “out of phase” with the neck pickup. You’ll get what happened to me: Neck pickup (position 1) sounds fine. Bridge pickup (position 5) sounds fine. Neck + Bridge (position 3) sounds thin and tinny, when it should sound full and complete like the pickups do by themselves.
Pickup polarity actually does not matter – except when you’re mixing signals from more than one pickup. It’s not “wrong” to wire up the Neck and Bridge out of phase, it’s just not how the INF1/INF2 are setup, and I think it sounds terrible. Position 4 (part of neck, part of bridge) has the out-of-phase sound already if you want that.
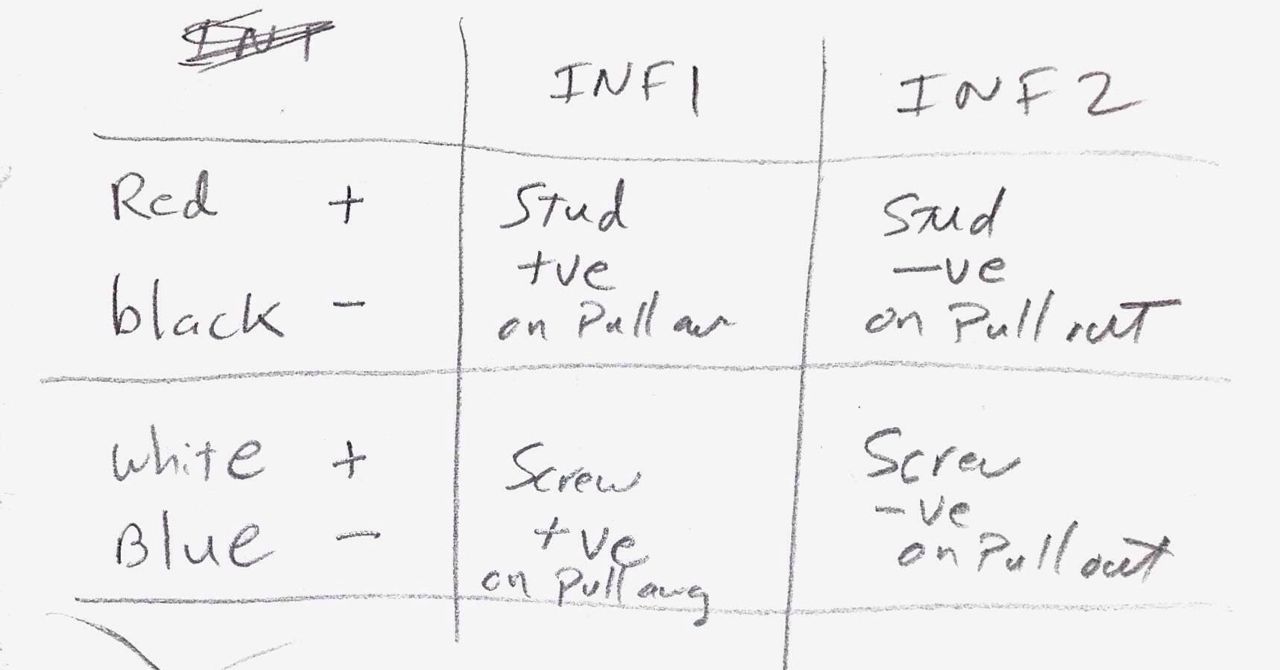
In my case, I soldered the wires all on, put it all back together and tried it to just to be very disappointed with the sound in positions 2,3, and 4. I recognized the out-of-phase sound and set about reversing the coils on the Crunch Lab to correct it. After the fact I measured the INF1 and INF2 to verify that yes, despite common wiring schemes they are inverse polarity.
I used the technique similar to this youtube video or documented in text here. Both those references are pretty good and explain what you need to do. I’ve already done the work for you though, and confirmed for myself that my INF1 and INF2 have opposite polarity.

An actual hand-written note I made while documenting the pickup polarities:
So with that little fact in mind, here’s an updated S420 wiring diagram that shows the connections for the new Dimarzio pickups.

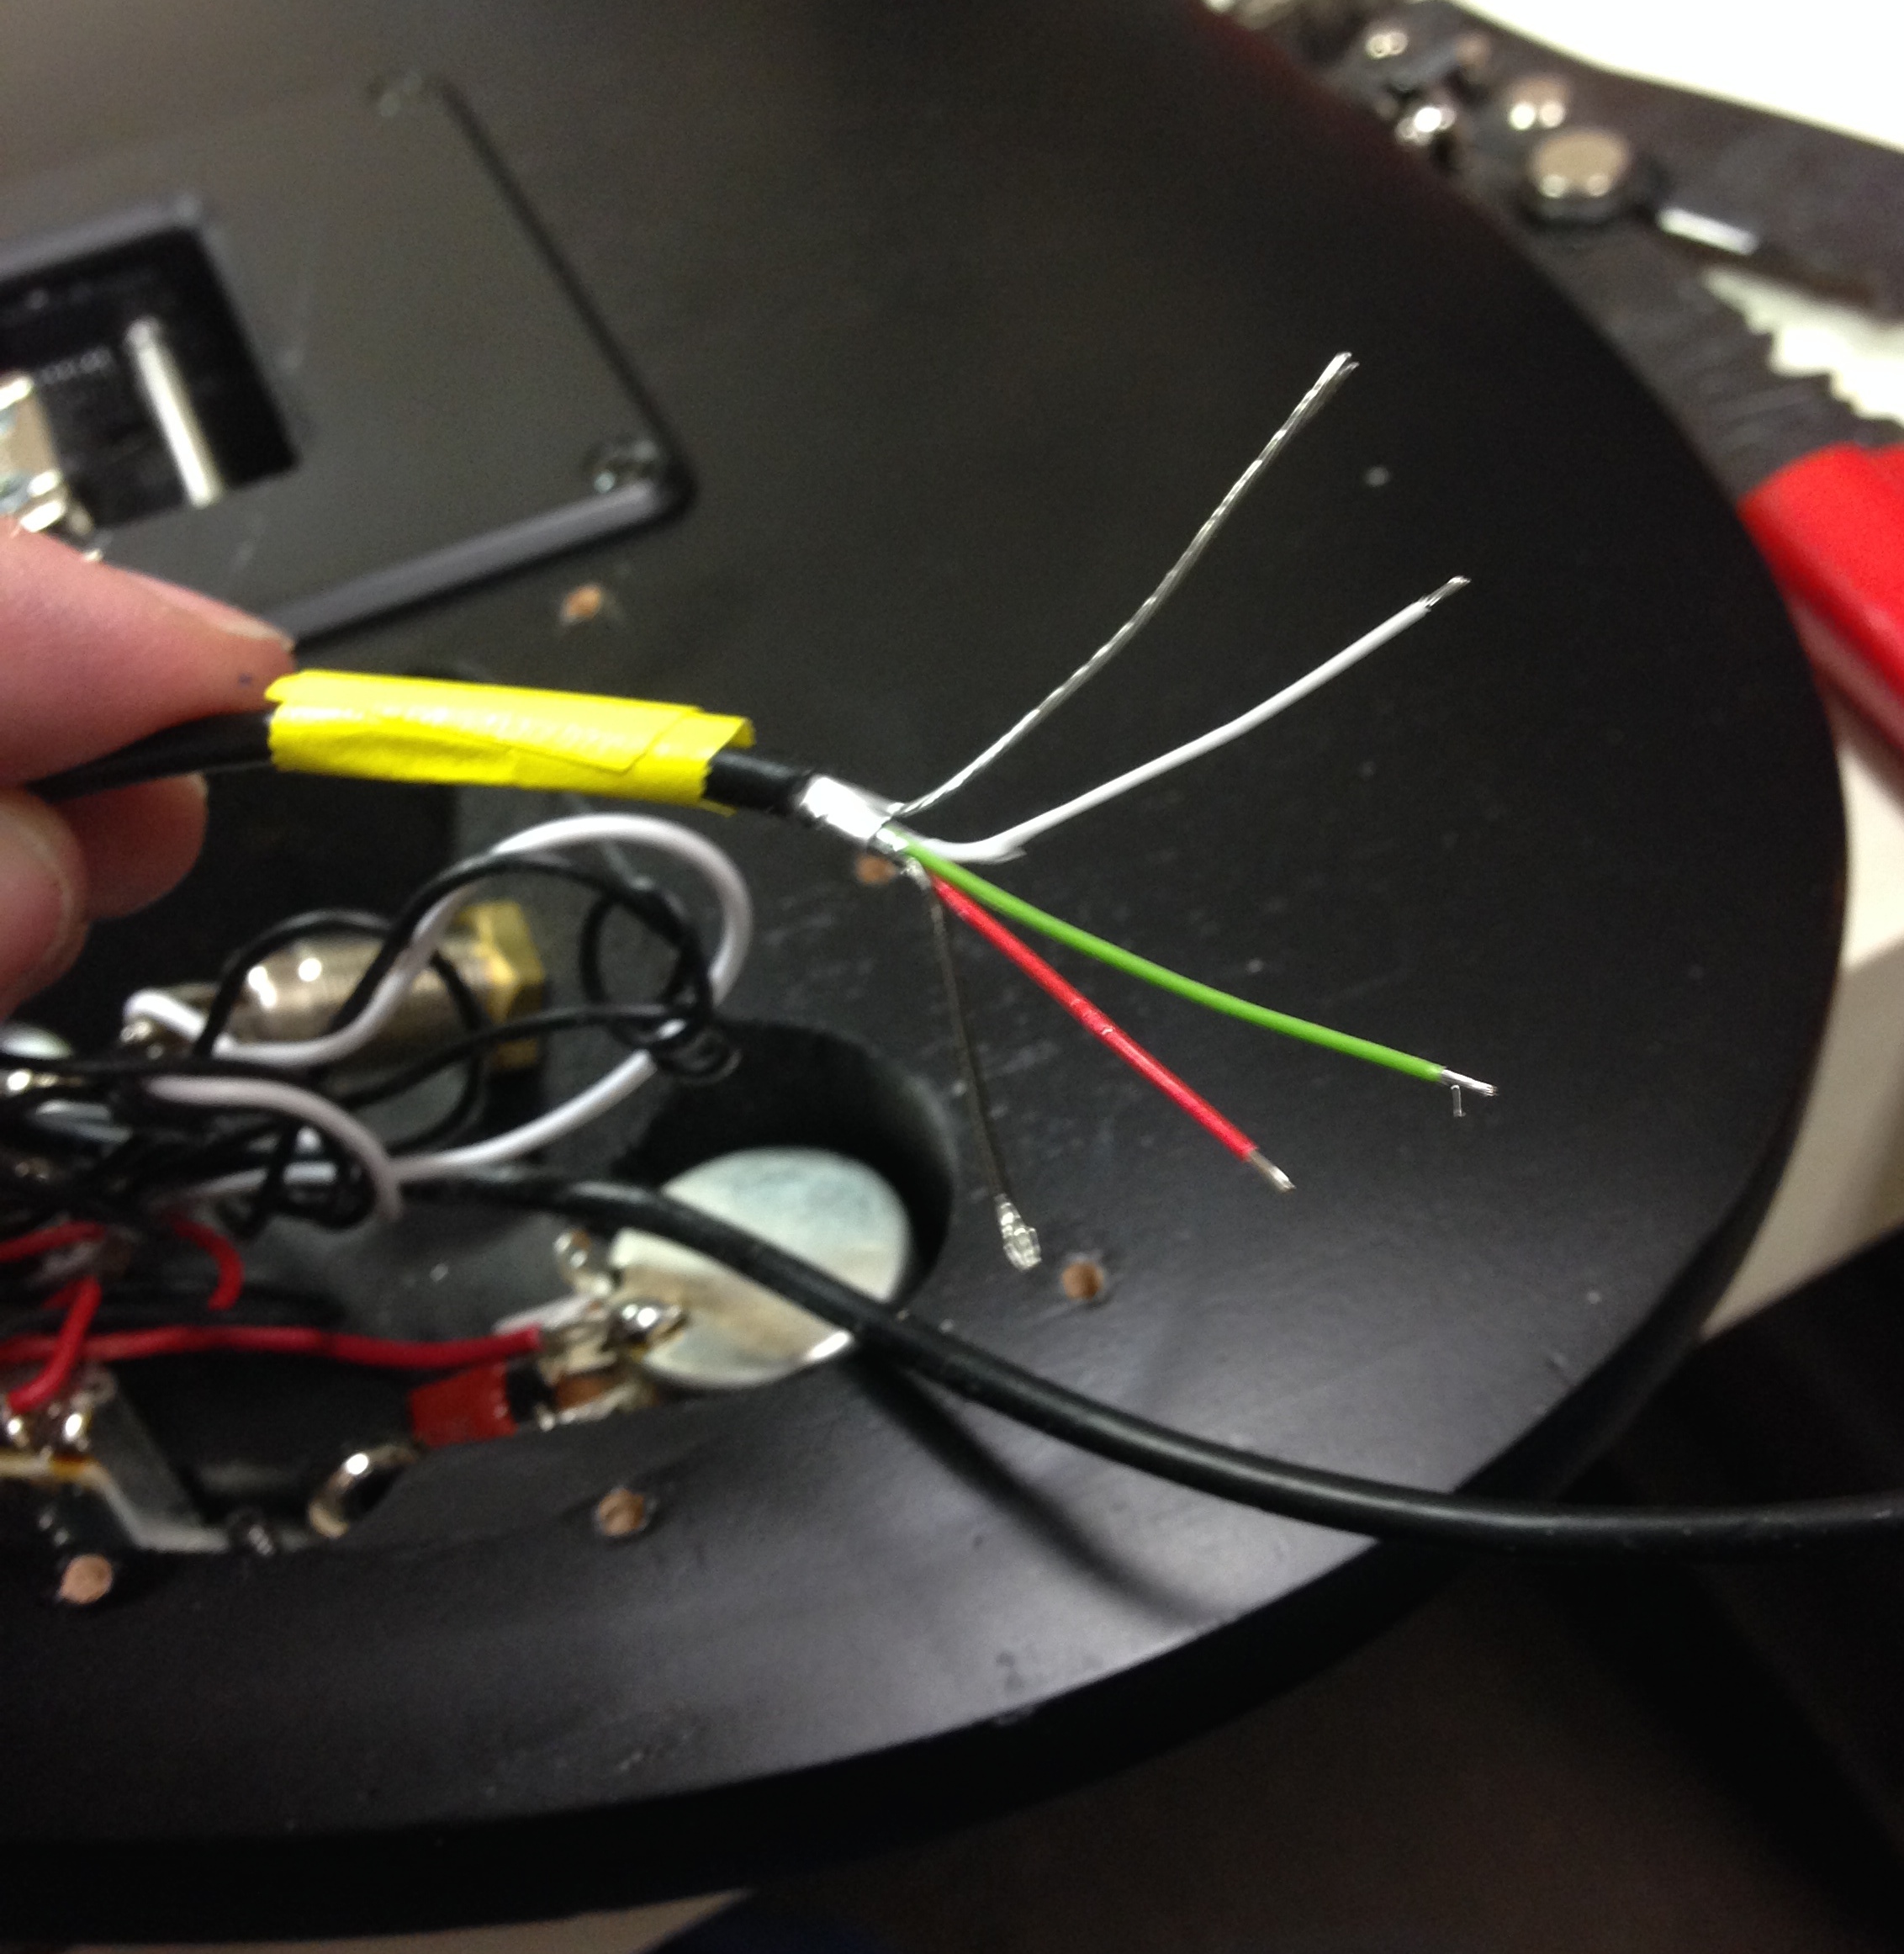
To actually do the change, unsolder the wires from the existing pickups, and be aware that you’ll have to snake the wires back through the small hole in the body, so don’t leave a lot of jagged garbage on the ends. Be smart and take pictures or document your stuff like I did before you take it apart.
I’m such a lazy bastard I didn’t even take the strings off to remove the pickups. I just slacked them off enough to wiggle the pickups out. You can use this opportunity to change the strings, so just take the damned strings off.

Take INF2 (the bridge pickup) out first. The wiring for INF1 goes through the INF2 cavity, so you’ll save yourself a lot of needless tugging on the wire like I did trying to get it loose.

You have to remove the INF1/INF2 from their metal mounts and screw the new Dimarzio pickups into them, snake the wires back through the hole so they come out in the wiring cavity, and then screw the pickups back into place. That whole part is easy.
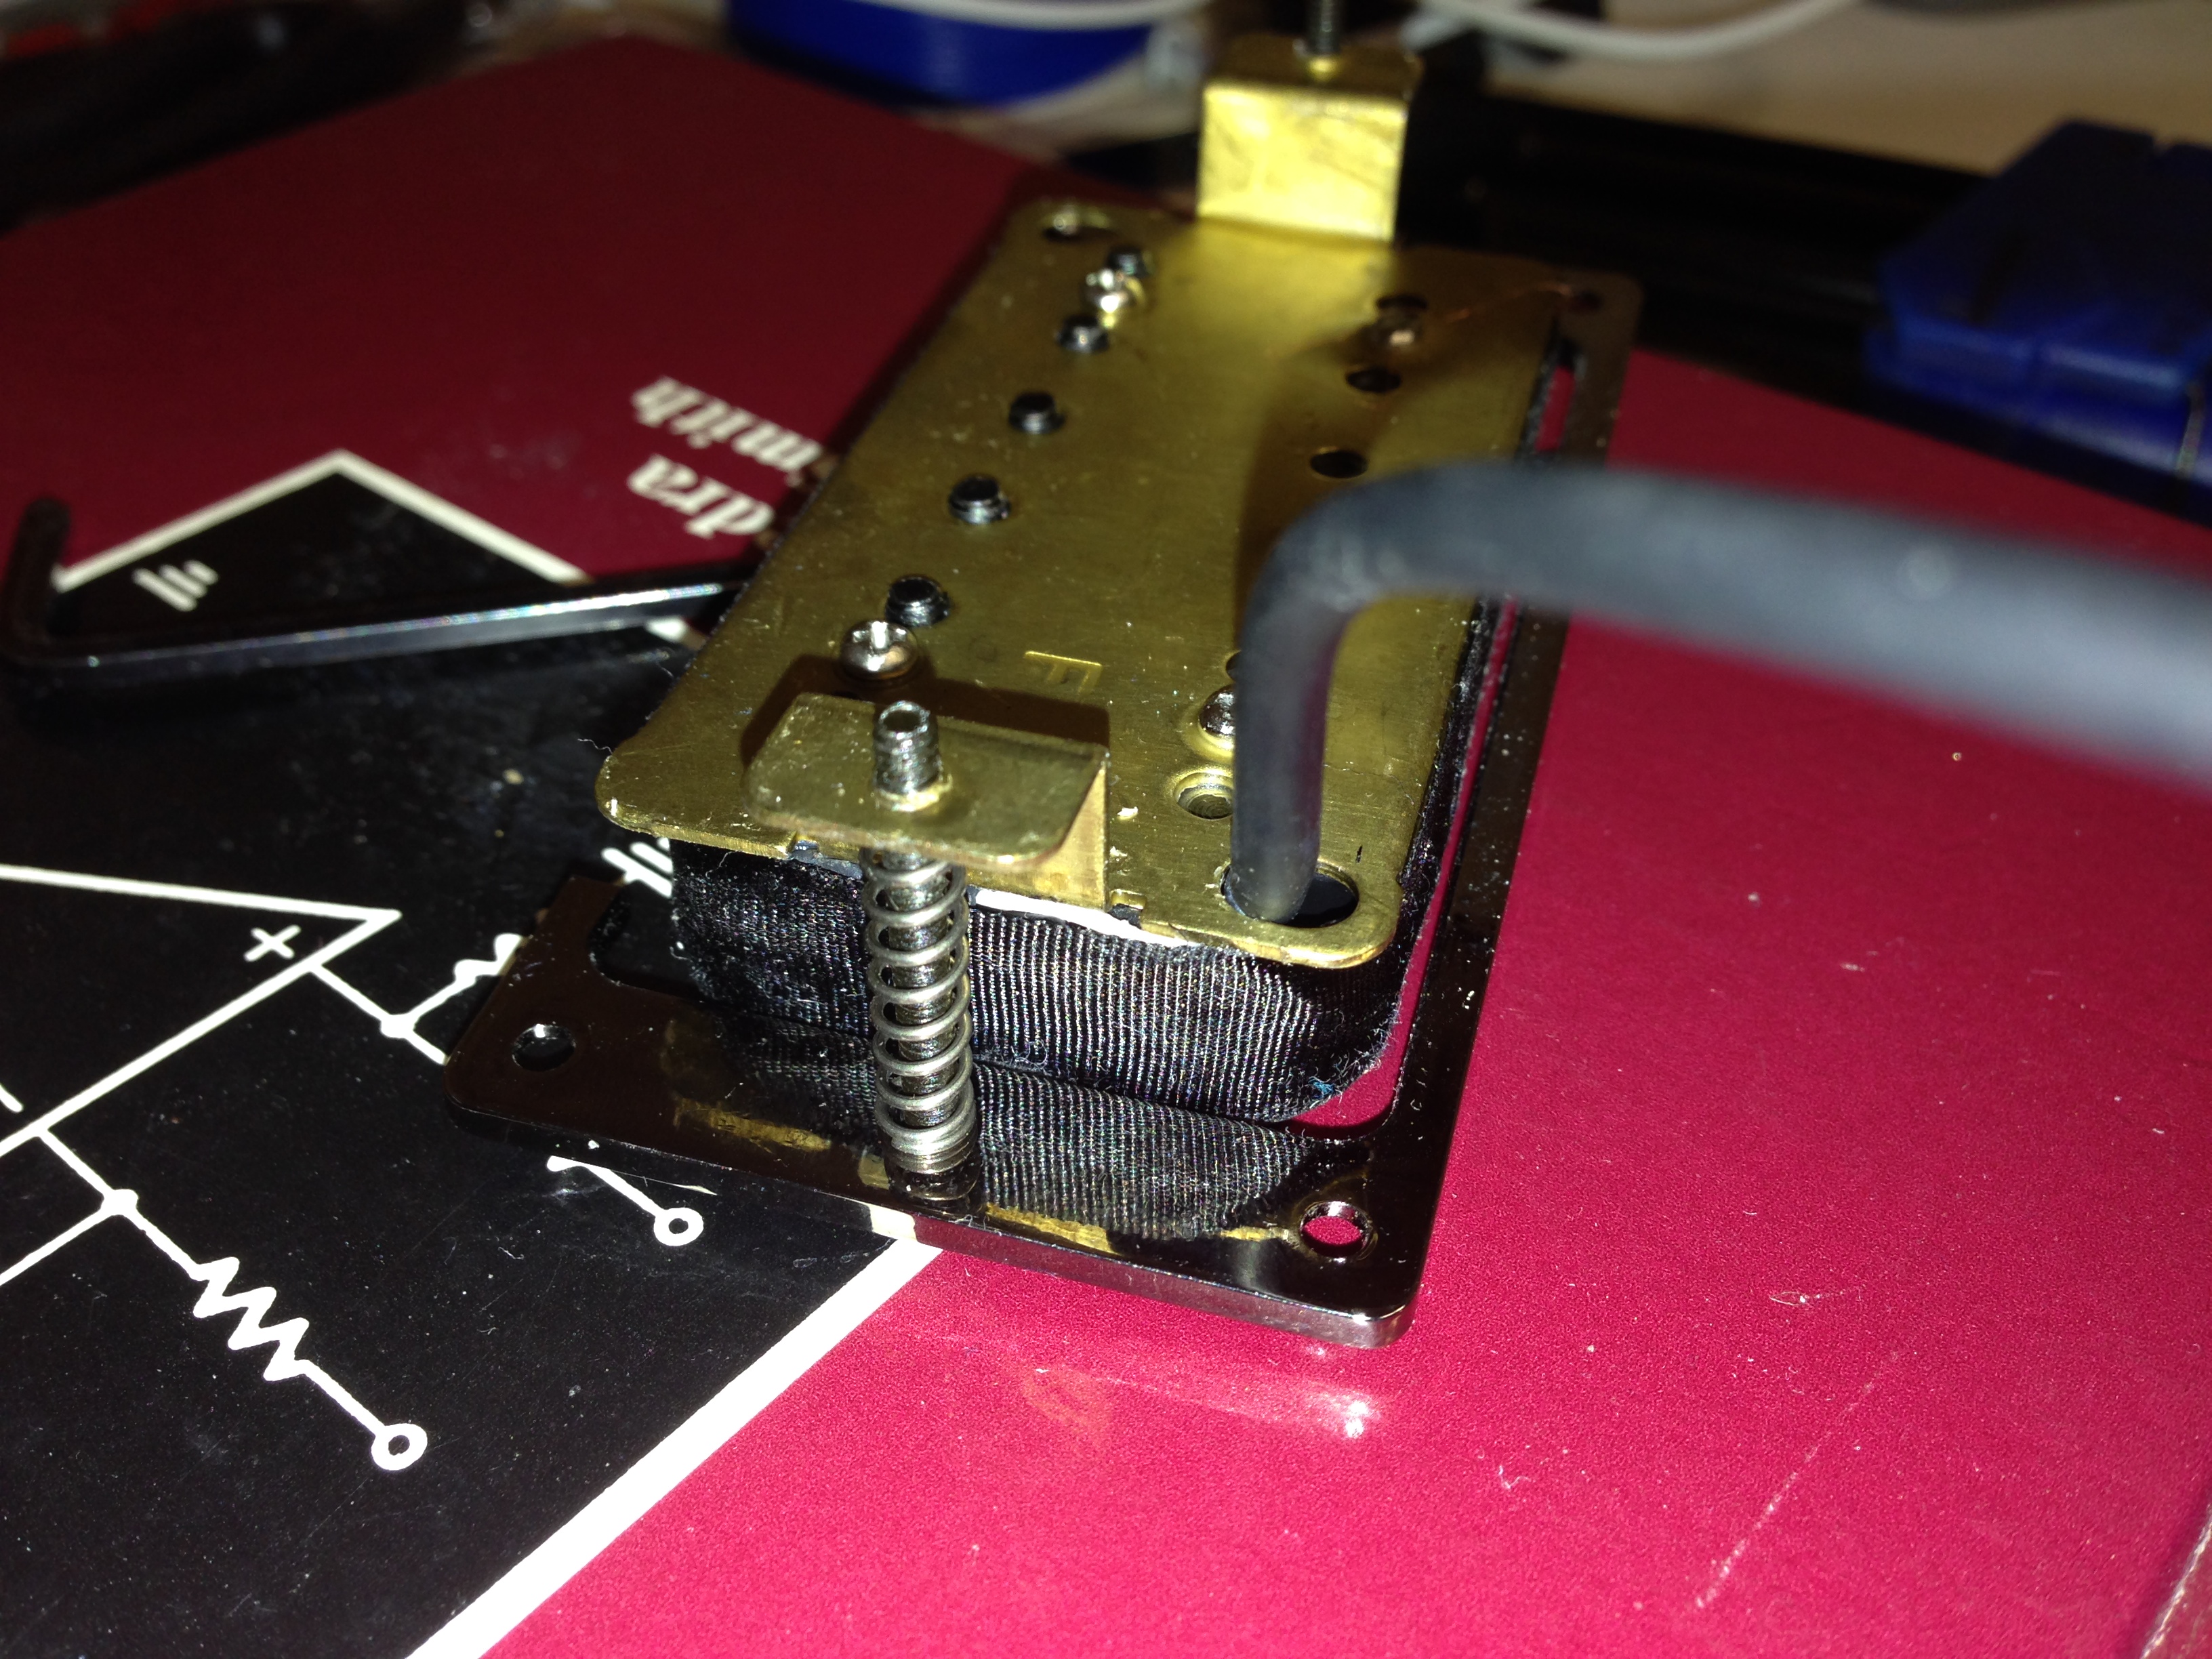

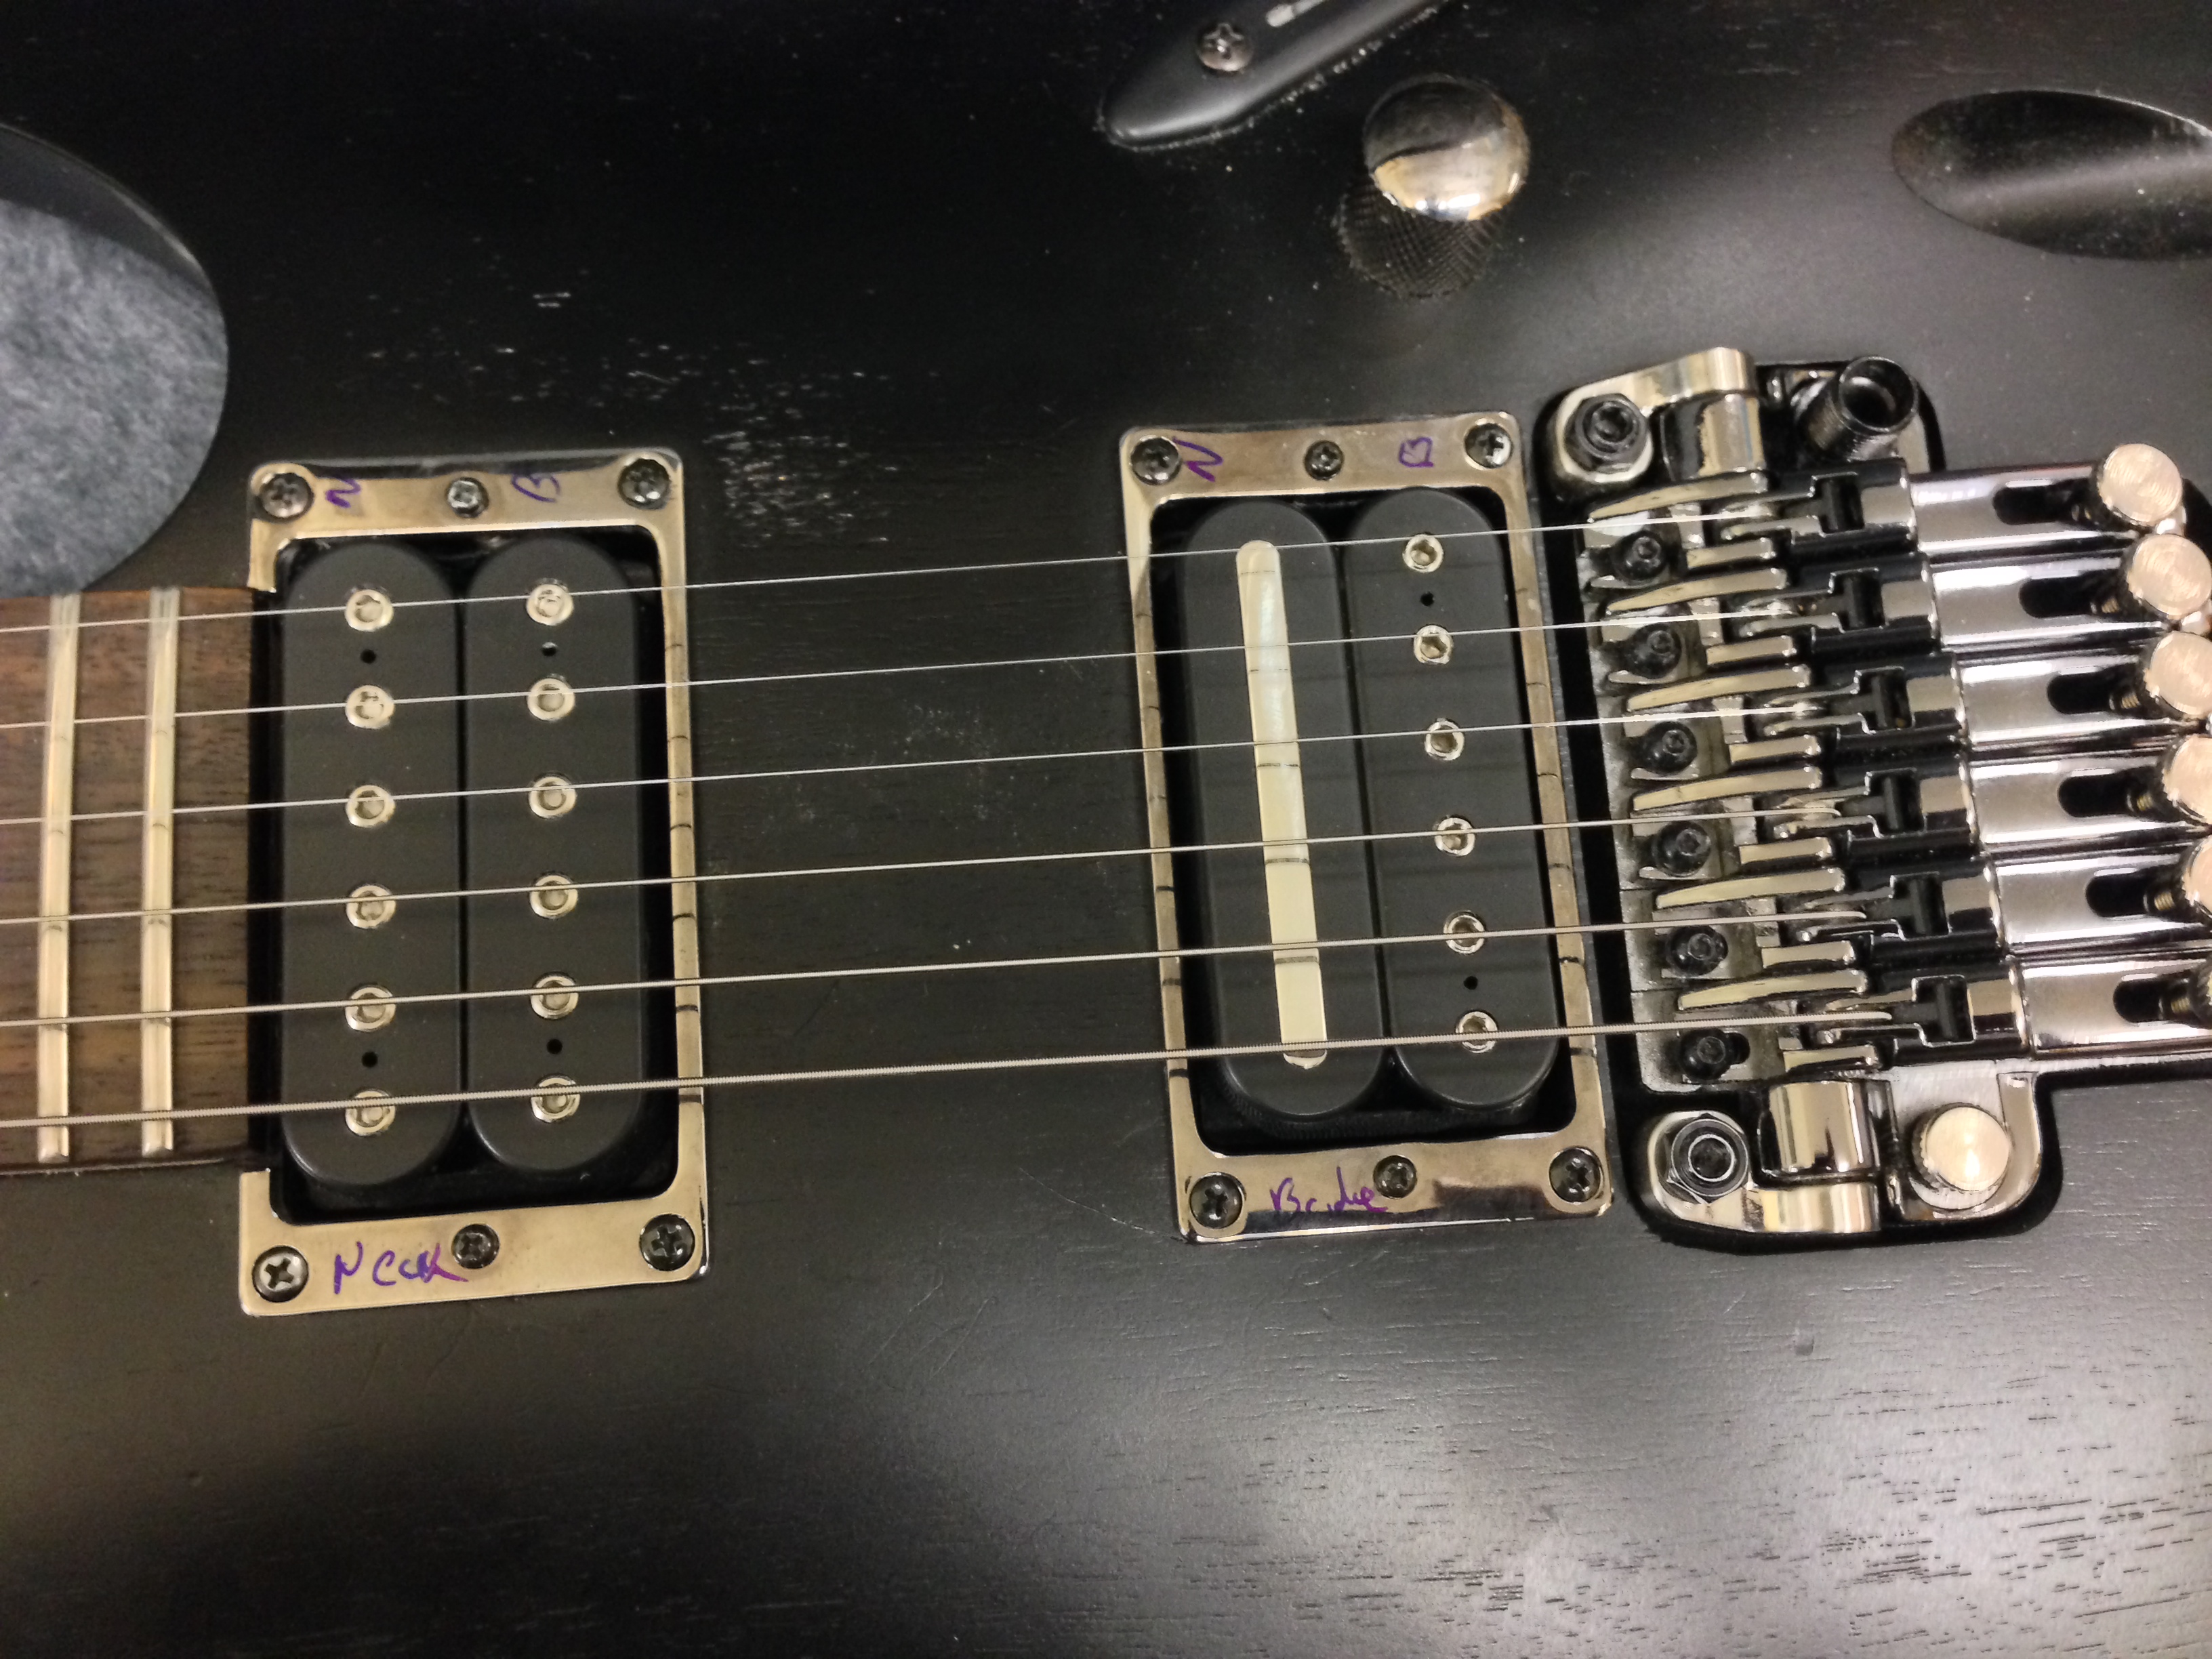
You might as well screw the pickups into the guitar body while you’re there, since you’re going to get this right on the first try and not have to take them out again. I put the Crunch Lab pickup with the bar towards the neck side (as pictured), as that seems to be the way Dimarzio says to use it, and it makes the wire snake on the side closest to the hole to make it easier to get into position.
From here really all you’re doing is following the wiring diagram and soldering wires back on where you took the other wires off: there’s no “new” wiring connections. The only twist is the reversing of the polarity of the Crunch Lab compared to the INF2. My wiring diagram above reflects this polarity reverse, so it’s “corrected.”
I’m not going to teach you how to solder, that’s up to you. I use a cheap Weller WLC100 (the red one) station with a big tip, set to heat around position 4. Why? No reason other than “at that setting it put enough heat out to melt the solder on the existing connections.”

I normally use a smaller tip for electronics work, but I found these huge masses of solder in the Ibanez cavity were not easily melted, so I switched to the big tip. I wouldn’t use one of those big awful-looking “gun” style units as those heat up really fast and would probably be pretty awkward in the small space.
Here’s the finished job with the Dimarzio wiring in place:
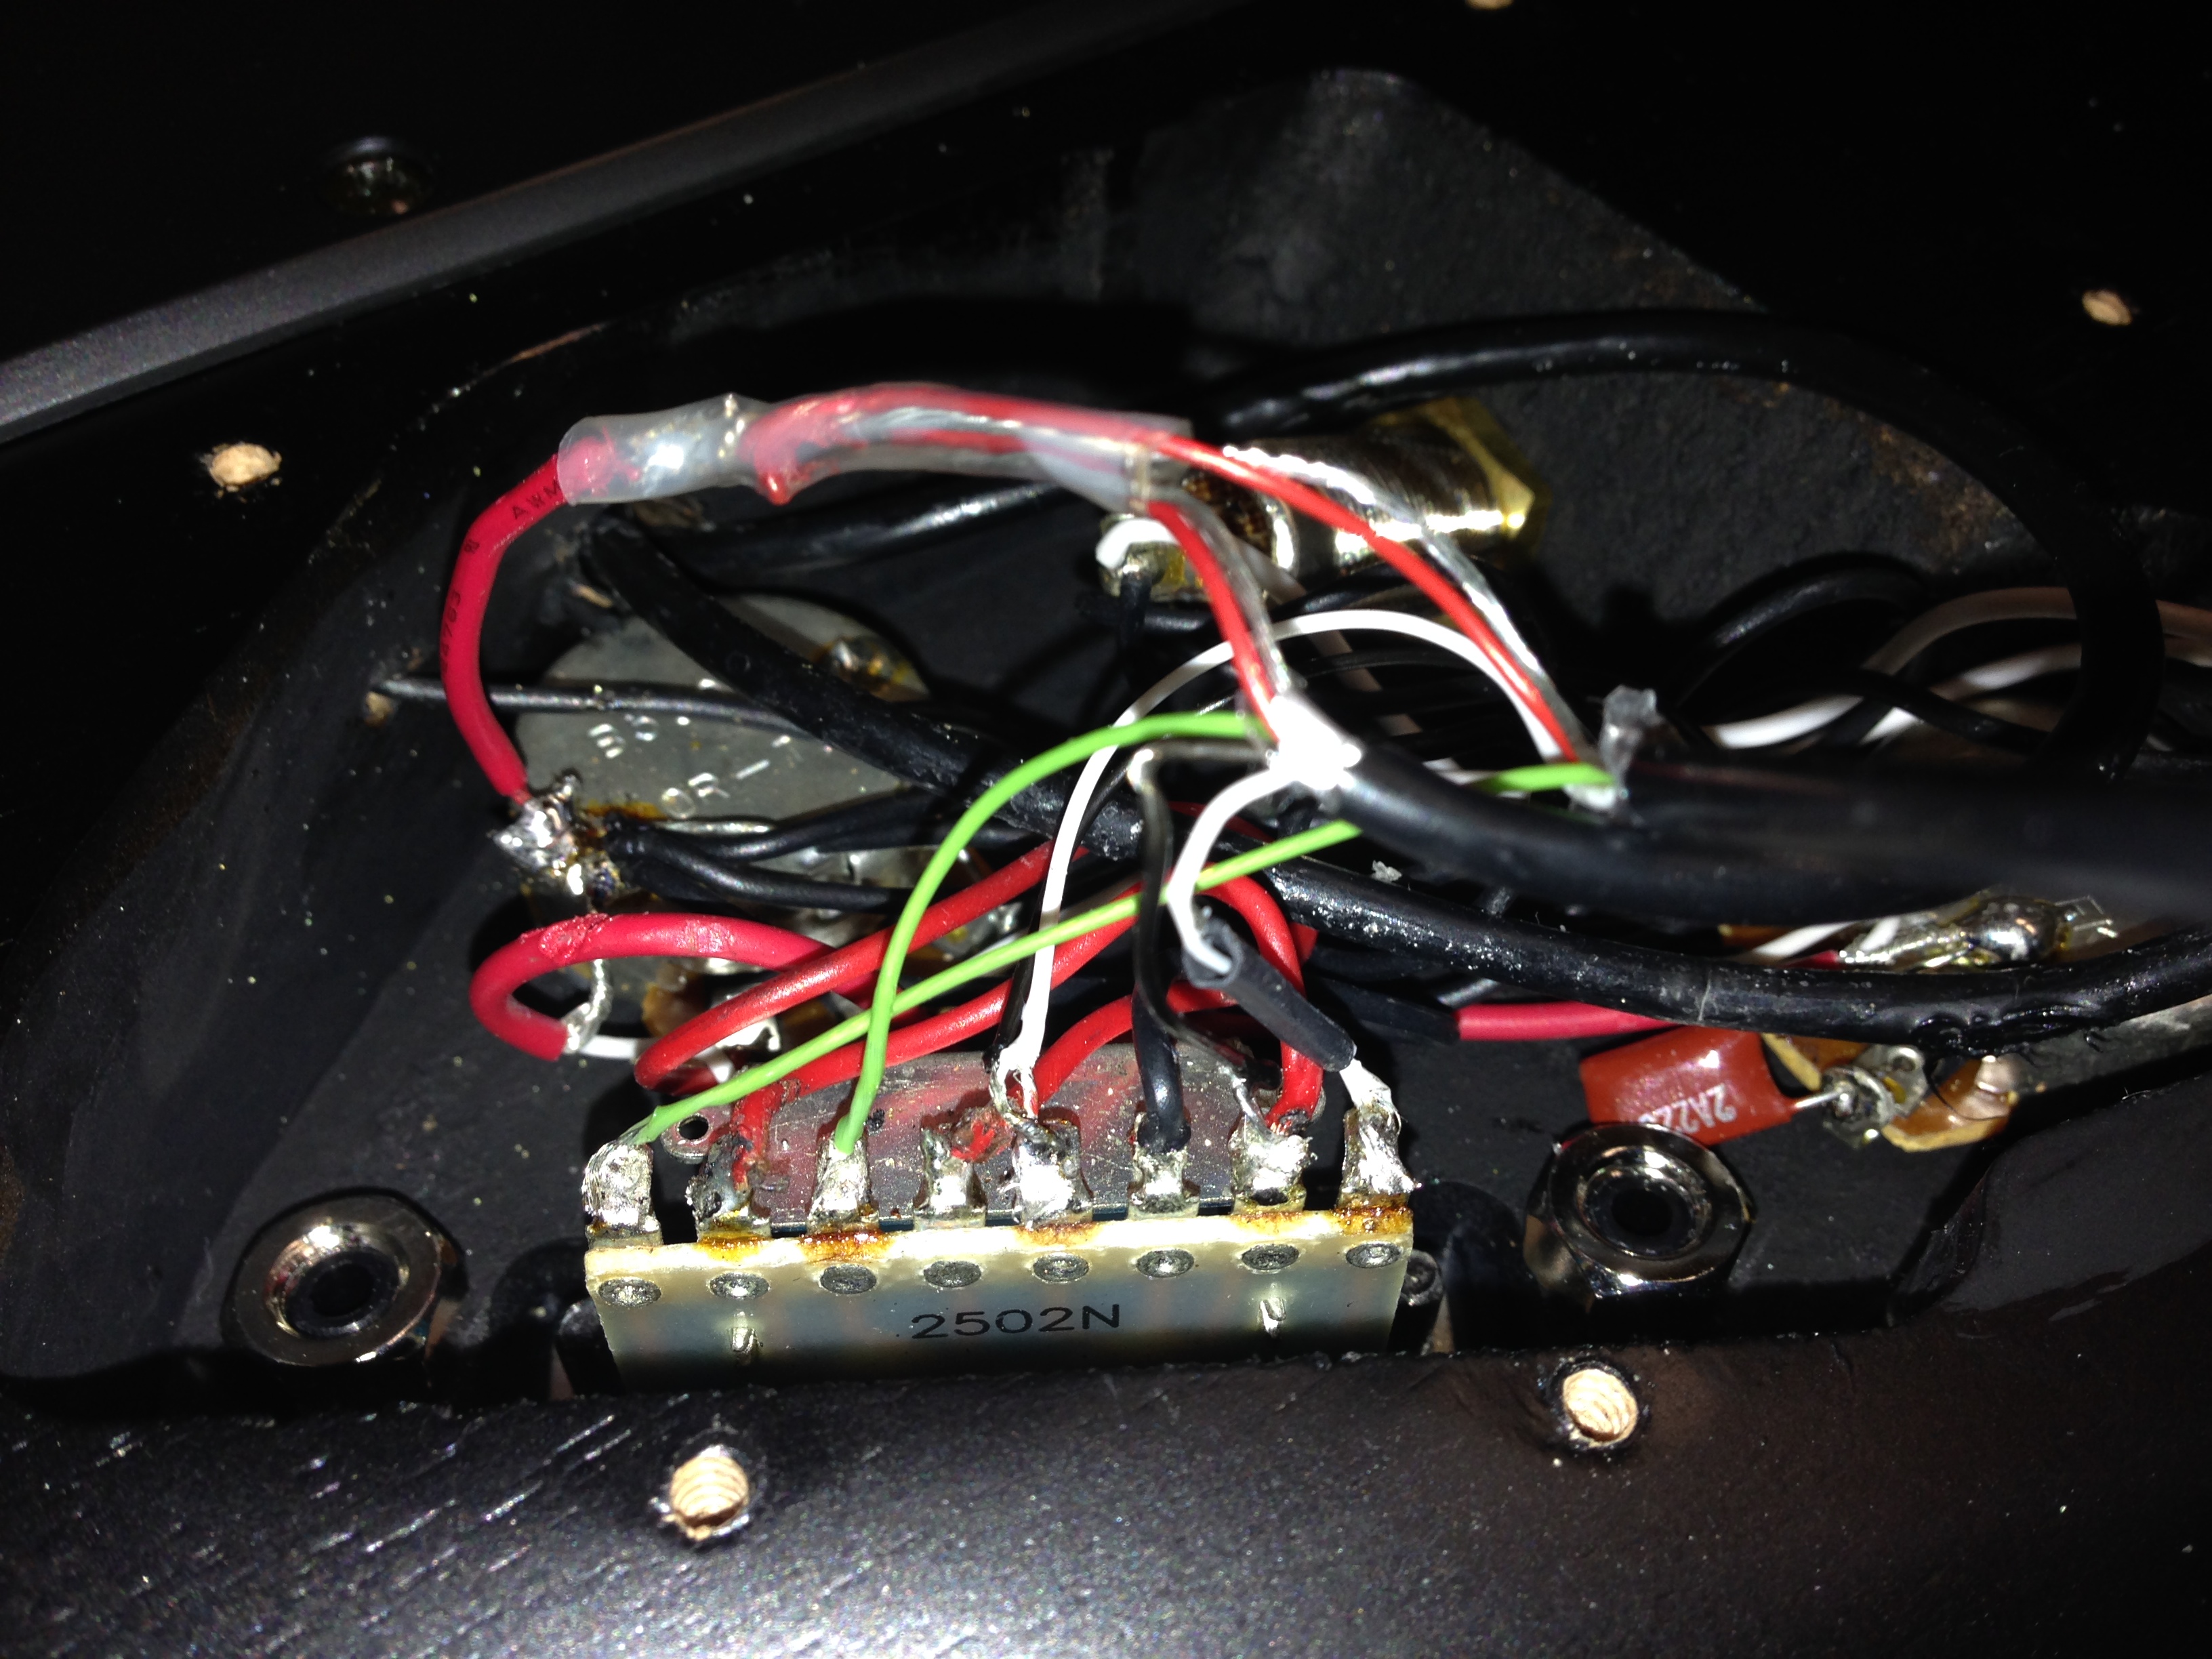
You can see that I had some trouble getting four stupid wires (one wire + shield from each pickup) to connect together and stay soldered to the common point on the potentiometer. I resolved that by soldering a nice lead (red wire) onto the pot, and then joining that to the four pickup wires. It looks terrible but it made the job easier without having to melt that blob of solder the size of Ganymede. Heat shrink is good on the wires to insulate, and more reliable than wrapping electrical tape.
The solder job you do here is the most important part, don’t do a half-ass job. The Dimarzio pickup wires are small and thin and a pain in the ass and the insulation melts far too easily, so you want to make sure you don’t have any stray strands of wire touching each other when you’re done. Also make sure the connections are secure and aren’t just going to pull off with a light amount of force.
Probably the best approach, if you’re not sure of yourself, is to solder the wires into place, keep the back of the cavity open, tighten up the strings and try out all the positions of the five-way switch to see that they all work and are phased properly. If you’ve got phase issues position 3 (two pickups together) will sound thin and tinny as the pickups work to cancel each other out rather than add their signals together. In my case after soldering the five-way selector became “noisy” when switching (humming, would buzz if you bumped the switch). This turned out to be loose strands from one of the pickup wires touching another contact on the five-way. Once I re-soldered those joints and cleaned them up it sounded fine with no bump-buzz noise.
Guitars are passive devices designed for amplifying noise. So once you’re happy with things, secure the wires so they won’t move around (cable ties are nice), and put that cavity cover back on securely with the screws. See the silver foil the cover has on the inside? That’s to cut noise down. Once it’s all back together plug in and make sure it’s not become noisy again. You should be able to tap and push on the cover and not have it start to buzz. If it does, you’ve got wires touching/too close and should take the cover off and try to secure them better.
After things are back together, you can go about setting the pickup height with the the little screw on either side of the metal mount (the one that had the spring on the inside). I won’t detail how to set “optimal” pickup height since I don’t know how, I just adjusted them until everything sounded even in volume between string one and six. You don’t need them really close to the strings, and having them too close will probably bend the strings and cause intonation problems. Pickup height is super easy to play with after you have the guitar back together though, so you can fuss with that to your heart’s content.
So after all that, the million dollar question (or $200, in my case). Does the S420 sound better with the new pickups? Recall at the start of this long drawn out article I lamented the lack of documentation on this, so I tried to provide that comparison. I recorded some garbage with the old pickups, then tried to record the same garbage using the new pickups. Bits are done in Logic X with a combination of Amplitube and NI Guitar Rig (for variety of sounds), and I use the same settings in Amplitube/NI Guitar Rig in both cases – I just opened the file in Logic and recorded over the old tracks after changing the pickups. Other than a temp drum track to keep my timing there are no other instruments used other than the S420.
If I remember right, the rhythm parts have the INF1 (neck) on the left channel, the INF2 (bridge) on the right channel.
In this the Liquifire (neck) is on the left channel, and the Crunch Lab (bridge) is on the right.
So do I think it sounds better? Probably. Maybe a little less boomy? Maybe it’s just all confirmation bias. At the very least I don’t like the stock pickups better, so I don’t have to put them back in.
Did you read all the way down here? Here’s my shameless plug. You can hear this guitar with the new pickups on my 2014 album Crap Chute’s Box of Devils and 2016’s Crap Chute’s Concentrated which you can get for a ridiculously low price or maybe free if you ask nicely.

You must be logged in to post a comment.